Previously has_object_permission defaulted to returning True when unimplemented because it was assumed that has_permission had already returned true, but when composed with OR, this might not be the case. Take for example the case where you want an object to be accessible by the user that created it or any admin. If you have a permission IsOwner that implements has_object_permission and IsAdminUser which doesn't, then if you OR them together an have a user that is neither the owner nor the admin they should get denied but instead IsOwner will pass has_permission and IsAdminUser will pass has_object_permission even though it didn't pass has_permission. One solution would be to default has_object_permission to calling has_permission but that would potentially cause redundant database lookups. Alternatively this could be done only in the OR class, but the redundant calls will still happen. Also, incorrect behavior can still occur using more complicated compositions including NOT. For example, the IsOwner permission above only implemented has_object_permission and not has_permission, but ~IsOwner will always fail, even on objects that the authenticated user doesn't own, because the default True from BasePermission.has_permission() will also be inverted. My solution is to be more explicit about when a permission subclass doesn't implement has_permission or has_object_permission by returning NotImplemented. NotImplemented is truthy in a boolean context, so by default everything will continue to work the same as long as code is not expecting the result to literally be True or False. I modified AND and OR so that if one side returns NotImplemented, it defers to the other. If both sides return NotImplemented, NotImplmented will be returned to propogate upwards. NOT will also propagate NotImplmented instead of inverting it. If NotImplemented propagates all the way up to APIView.check_permissions or APIView.check_object_permissions, it is considered a pass (truthy). |
||
|---|---|---|
| .github | ||
| .tx | ||
| docs | ||
| docs_theme | ||
| licenses | ||
| requirements | ||
| rest_framework | ||
| tests | ||
| .gitignore | ||
| .pre-commit-config.yaml | ||
| codecov.yml | ||
| CONTRIBUTING.md | ||
| LICENSE.md | ||
| MANIFEST.in | ||
| mkdocs.yml | ||
| PULL_REQUEST_TEMPLATE.md | ||
| README.md | ||
| requirements.txt | ||
| runtests.py | ||
| SECURITY.md | ||
| setup.cfg | ||
| setup.py | ||
| tox.ini | ||
Django REST framework
![]()


Awesome web-browsable Web APIs.
Full documentation for the project is available at https://www.django-rest-framework.org/.
Funding
REST framework is a collaboratively funded project. If you use REST framework commercially we strongly encourage you to invest in its continued development by signing up for a paid plan.
The initial aim is to provide a single full-time position on REST framework. Every single sign-up makes a significant impact towards making that possible.


Many thanks to all our wonderful sponsors, and in particular to our premium backers, Sentry, Stream, Rollbar, ESG, Retool, and bit.io.
Overview
Django REST framework is a powerful and flexible toolkit for building Web APIs.
Some reasons you might want to use REST framework:
- The Web browsable API is a huge usability win for your developers.
- Authentication policies including optional packages for OAuth1a and OAuth2.
- Serialization that supports both ORM and non-ORM data sources.
- Customizable all the way down - just use regular function-based views if you don't need the more powerful features.
- Extensive documentation, and great community support.
There is a live example API for testing purposes, available here.
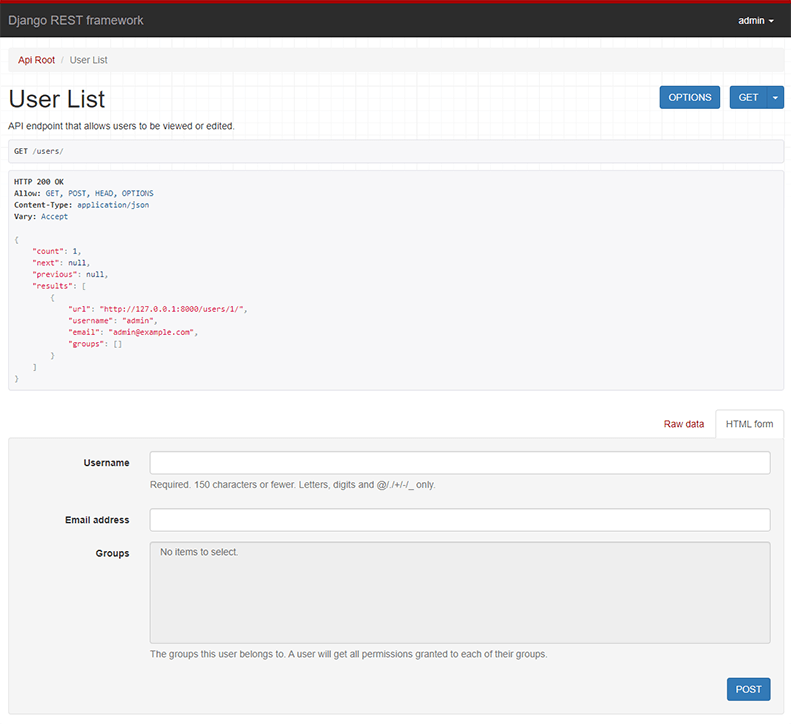
Below: Screenshot from the browsable API
Requirements
- Python (3.5, 3.6, 3.7, 3.8, 3.9)
- Django (2.2, 3.0, 3.1)
We highly recommend and only officially support the latest patch release of each Python and Django series.
Installation
Install using pip...
pip install djangorestframework
Add 'rest_framework' to your INSTALLED_APPS setting.
INSTALLED_APPS = [
    ...
    'rest_framework',
]
Example
Let's take a look at a quick example of using REST framework to build a simple model-backed API for accessing users and groups.
Startup up a new project like so...
pip install django
pip install djangorestframework
django-admin startproject example .
./manage.py migrate
./manage.py createsuperuser
Now edit the example/urls.py module in your project:
from django.urls import path, include
from django.contrib.auth.models import User
from rest_framework import serializers, viewsets, routers

# Serializers define the API representation.
class UserSerializer(serializers.HyperlinkedModelSerializer):
    class Meta:
        model = User
        fields = ['url', 'username', 'email', 'is_staff']


# ViewSets define the view behavior.
class UserViewSet(viewsets.ModelViewSet):
    queryset = User.objects.all()
    serializer_class = UserSerializer


# Routers provide a way of automatically determining the URL conf.
router = routers.DefaultRouter()
router.register(r'users', UserViewSet)


# Wire up our API using automatic URL routing.
# Additionally, we include login URLs for the browsable API.
urlpatterns = [
    path('', include(router.urls)),
    path('api-auth/', include('rest_framework.urls', namespace='rest_framework')),
]
We'd also like to configure a couple of settings for our API.
Add the following to your settings.py module:
INSTALLED_APPS = [
    ...  # Make sure to include the default installed apps here.
    'rest_framework',
]

REST_FRAMEWORK = {
    # Use Django's standard `django.contrib.auth` permissions,
    # or allow read-only access for unauthenticated users.
    'DEFAULT_PERMISSION_CLASSES': [
        'rest_framework.permissions.DjangoModelPermissionsOrAnonReadOnly',
    ]
}
That's it, we're done!
./manage.py runserver
You can now open the API in your browser at http://127.0.0.1:8000/, and view your new 'users' API. If you use the Login control in the top right corner you'll also be able to add, create and delete users from the system.
You can also interact with the API using command line tools such as curl. For example, to list the users endpoint:
$ curl -H 'Accept: application/json; indent=4' -u admin:password http://127.0.0.1:8000/users/
[
    {
        "url": "http://127.0.0.1:8000/users/1/",
        "username": "admin",
        "email": "admin@example.com",
        "is_staff": true,
    }
]
Or to create a new user:
$ curl -X POST -d username=new -d email=new@example.com -d is_staff=false -H 'Accept: application/json; indent=4' -u admin:password http://127.0.0.1:8000/users/
{
    "url": "http://127.0.0.1:8000/users/2/",
    "username": "new",
    "email": "new@example.com",
    "is_staff": false,
}
Documentation & Support
Full documentation for the project is available at https://www.django-rest-framework.org/.
For questions and support, use the REST framework discussion group, or #restframework on freenode IRC.
You may also want to follow the author on Twitter.
Security
Please see the security policy.