---
title: Layers and Model Architectures
teaser: Power spaCy components with custom neural networks
menu:
- ['Type Signatures', 'type-sigs']
- ['Swapping Architectures', 'swap-architectures']
- ['PyTorch & TensorFlow', 'frameworks']
- ['Custom Thinc Models', 'thinc']
- ['Trainable Components', 'components']
next: /usage/projects
---
> #### Example
>
> ```python
> from thinc.api import Model, chain
>
> @spacy.registry.architectures.register("model.v1")
> def build_model(width: int, classes: int) -> Model:
> tok2vec = build_tok2vec(width)
> output_layer = build_output_layer(width, classes)
> model = chain(tok2vec, output_layer)
> return model
> ```
A **model architecture** is a function that wires up a
[Thinc `Model`](https://thinc.ai/docs/api-model) instance. It describes the
neural network that is run internally as part of a component in a spaCy
pipeline. To define the actual architecture, you can implement your logic in
Thinc directly, or you can use Thinc as a thin wrapper around frameworks such as
PyTorch, TensorFlow and MXNet. Each `Model` can also be used as a sublayer of a
larger network, allowing you to freely combine implementations from different
frameworks into a single model.
spaCy's built-in components require a `Model` instance to be passed to them via
the config system. To change the model architecture of an existing component,
you just need to [**update the config**](#swap-architectures) so that it refers
to a different registered function. Once the component has been created from
this config, you won't be able to change it anymore. The architecture is like a
recipe for the network, and you can't change the recipe once the dish has
already been prepared. You have to make a new one.
```ini
### config.cfg (excerpt)
[components.tagger]
factory = "tagger"
[components.tagger.model]
@architectures = "model.v1"
width = 512
classes = 16
```
## Type signatures {#type-sigs}
> #### Example
>
> ```python
> from typing import List
> from thinc.api import Model, chain
> from thinc.types import Floats2d
> def chain_model(
> tok2vec: Model[List[Doc], List[Floats2d]],
> layer1: Model[List[Floats2d], Floats2d],
> layer2: Model[Floats2d, Floats2d]
> ) -> Model[List[Doc], Floats2d]:
> model = chain(tok2vec, layer1, layer2)
> return model
> ```
The Thinc `Model` class is a **generic type** that can specify its input and
output types. Python uses a square-bracket notation for this, so the type
~~Model[List, Dict]~~ says that each batch of inputs to the model will be a
list, and the outputs will be a dictionary. You can be even more specific and
write for instance~~Model[List[Doc], Dict[str, float]]~~ to specify that the
model expects a list of [`Doc`](/api/doc) objects as input, and returns a
dictionary mapping of strings to floats. Some of the most common types you'll
see are:
| Type | Description |
| ------------------ | ---------------------------------------------------------------------------------------------------- |
| ~~List[Doc]~~ | A batch of [`Doc`](/api/doc) objects. Most components expect their models to take this as input. |
| ~~Floats2d~~ | A two-dimensional `numpy` or `cupy` array of floats. Usually 32-bit. |
| ~~Ints2d~~ | A two-dimensional `numpy` or `cupy` array of integers. Common dtypes include uint64, int32 and int8. |
| ~~List[Floats2d]~~ | A list of two-dimensional arrays, generally with one array per `Doc` and one row per token. |
| ~~Ragged~~ | A container to handle variable-length sequence data in an unpadded contiguous array. |
| ~~Padded~~ | A container to handle variable-length sequence data in a padded contiguous array. |
See the [Thinc type reference](https://thinc.ai/docs/api-types) for details. The
model type signatures help you figure out which model architectures and
components can **fit together**. For instance, the
[`TextCategorizer`](/api/textcategorizer) class expects a model typed
~~Model[List[Doc], Floats2d]~~, because the model will predict one row of
category probabilities per [`Doc`](/api/doc). In contrast, the
[`Tagger`](/api/tagger) class expects a model typed ~~Model[List[Doc],
List[Floats2d]]~~, because it needs to predict one row of probabilities per
token.
There's no guarantee that two models with the same type signature can be used
interchangeably. There are many other ways they could be incompatible. However,
if the types don't match, they almost surely _won't_ be compatible. This little
bit of validation goes a long way, especially if you
[configure your editor](https://thinc.ai/docs/usage-type-checking) or other
tools to highlight these errors early. The config file is also validated at the
beginning of training, to verify that all the types match correctly.
If you're using a modern editor like Visual Studio Code, you can
[set up `mypy`](https://thinc.ai/docs/usage-type-checking#install) with the
custom Thinc plugin and get live feedback about mismatched types as you write
code.
[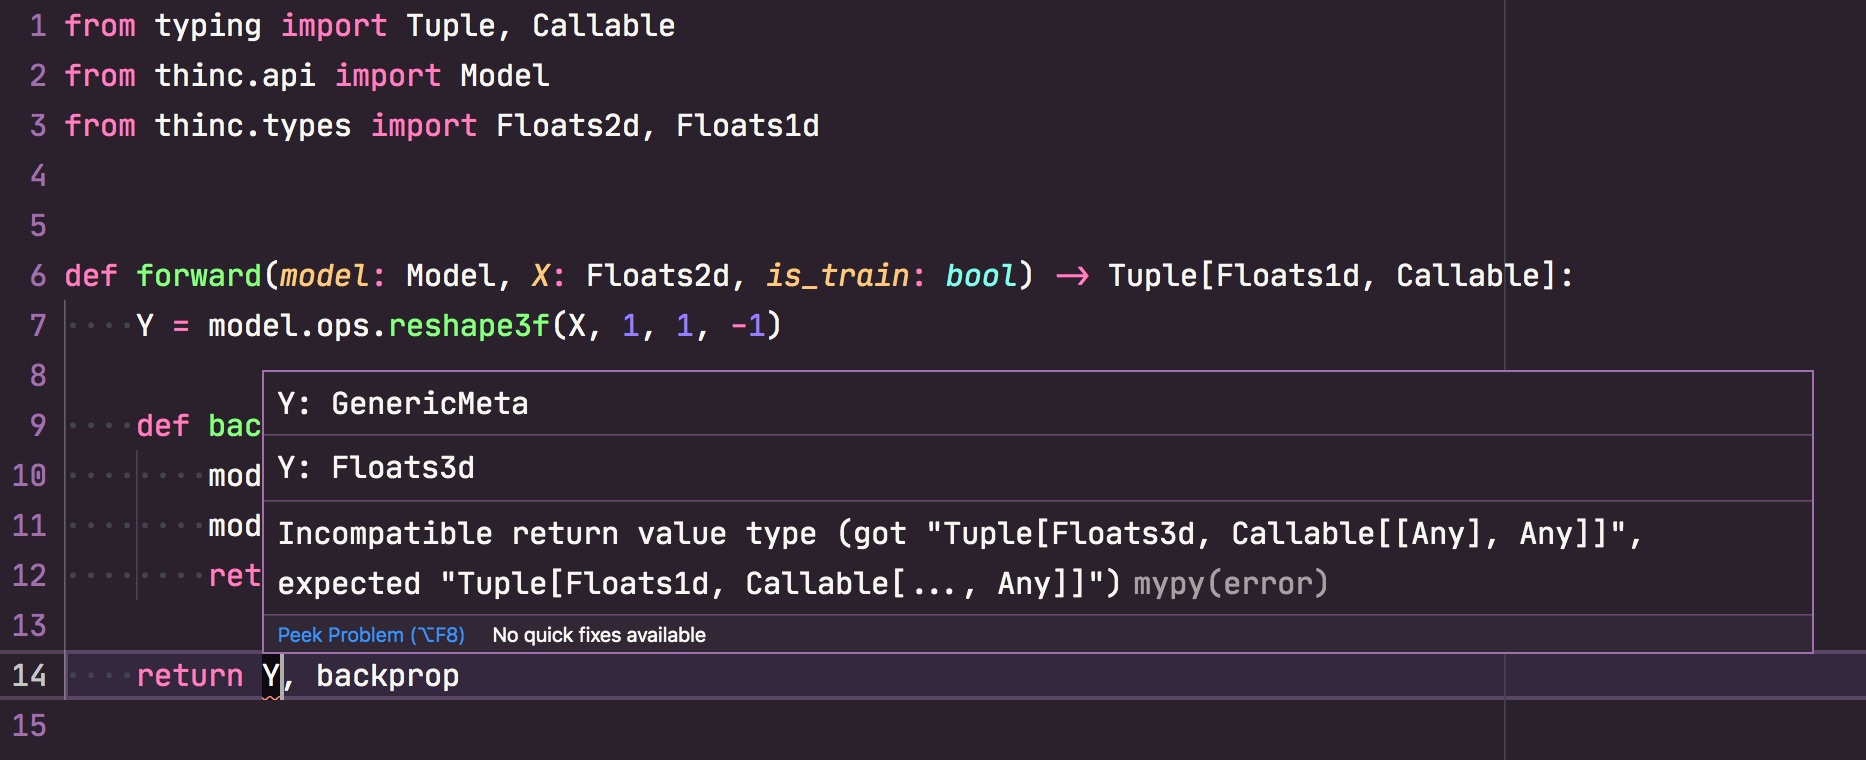](https://thinc.ai/docs/usage-type-checking#linting)
## Swapping model architectures {#swap-architectures}
If no model is specified for the [`TextCategorizer`](/api/textcategorizer), the
[TextCatEnsemble](/api/architectures#TextCatEnsemble) architecture is used by
default. This architecture combines a simple bag-of-words model with a neural
network, usually resulting in the most accurate results, but at the cost of
speed. The config file for this model would look something like this:
```ini
### config.cfg (excerpt)
[components.textcat]
factory = "textcat"
labels = []
[components.textcat.model]
@architectures = "spacy.TextCatEnsemble.v2"
nO = null
[components.textcat.model.tok2vec]
@architectures = "spacy.Tok2Vec.v1"
[components.textcat.model.tok2vec.embed]
@architectures = "spacy.MultiHashEmbed.v1"
width = 64
rows = [2000, 2000, 1000, 1000, 1000, 1000]
attrs = ["ORTH", "LOWER", "PREFIX", "SUFFIX", "SHAPE", "ID"]
include_static_vectors = false
[components.textcat.model.tok2vec.encode]
@architectures = "spacy.MaxoutWindowEncoder.v1"
width = ${components.textcat.model.tok2vec.embed.width}
window_size = 1
maxout_pieces = 3
depth = 2
[components.textcat.model.linear_model]
@architectures = "spacy.TextCatBOW.v1"
exclusive_classes = false
ngram_size = 1
no_output_layer = false
```
spaCy has two additional built-in `textcat` architectures, and you can easily
use those by swapping out the definition of the textcat's model. For instance,
to use the simple and fast bag-of-words model
[TextCatBOW](/api/architectures#TextCatBOW), you can change the config to:
```ini
### config.cfg (excerpt) {highlight="6-10"}
[components.textcat]
factory = "textcat"
labels = []
[components.textcat.model]
@architectures = "spacy.TextCatBOW.v1"
exclusive_classes = false
ngram_size = 1
no_output_layer = false
nO = null
```
For details on all pre-defined architectures shipped with spaCy and how to
configure them, check out the [model architectures](/api/architectures)
documentation.
### Defining sublayers {#sublayers}
Model architecture functions often accept **sublayers as arguments**, so that
you can try **substituting a different layer** into the network. Depending on
how the architecture function is structured, you might be able to define your
network structure entirely through the [config system](/usage/training#config),
using layers that have already been defined.
In most neural network models for NLP, the most important parts of the network
are what we refer to as the
[embed and encode](https://explosion.ai/blog/deep-learning-formula-nlp) steps.
These steps together compute dense, context-sensitive representations of the
tokens, and their combination forms a typical
[`Tok2Vec`](/api/architectures#Tok2Vec) layer:
```ini
### config.cfg (excerpt)
[components.tok2vec]
factory = "tok2vec"
[components.tok2vec.model]
@architectures = "spacy.Tok2Vec.v1"
[components.tok2vec.model.embed]
@architectures = "spacy.MultiHashEmbed.v1"
# ...
[components.tok2vec.model.encode]
@architectures = "spacy.MaxoutWindowEncoder.v1"
# ...
```
By defining these sublayers specifically, it becomes straightforward to swap out
a sublayer for another one, for instance changing the first sublayer to a
character embedding with the [CharacterEmbed](/api/architectures#CharacterEmbed)
architecture:
```ini
### config.cfg (excerpt)
[components.tok2vec.model.embed]
@architectures = "spacy.CharacterEmbed.v1"
# ...
[components.tok2vec.model.encode]
@architectures = "spacy.MaxoutWindowEncoder.v1"
# ...
```
Most of spaCy's default architectures accept a `tok2vec` layer as a sublayer
within the larger task-specific neural network. This makes it easy to **switch
between** transformer, CNN, BiLSTM or other feature extraction approaches. The
[transformers documentation](/usage/embeddings-transformers#training-custom-model)
section shows an example of swapping out a model's standard `tok2vec` layer with
a transformer. And if you want to define your own solution, all you need to do
is register a ~~Model[List[Doc], List[Floats2d]]~~ architecture function, and
you'll be able to try it out in any of the spaCy components.
## Wrapping PyTorch, TensorFlow and other frameworks {#frameworks}
Thinc allows you to [wrap models](https://thinc.ai/docs/usage-frameworks)
written in other machine learning frameworks like PyTorch, TensorFlow and MXNet
using a unified [`Model`](https://thinc.ai/docs/api-model) API. This makes it
easy to use a model implemented in a different framework to power a component in
your spaCy pipeline. For example, to wrap a PyTorch model as a Thinc `Model`,
you can use Thinc's
[`PyTorchWrapper`](https://thinc.ai/docs/api-layers#pytorchwrapper):
```python
from thinc.api import PyTorchWrapper
wrapped_pt_model = PyTorchWrapper(torch_model)
```
Let's use PyTorch to define a very simple neural network consisting of two
hidden `Linear` layers with `ReLU` activation and dropout, and a
softmax-activated output layer:
```python
### PyTorch model
from torch import nn
torch_model = nn.Sequential(
nn.Linear(width, hidden_width),
nn.ReLU(),
nn.Dropout2d(dropout),
nn.Linear(hidden_width, nO),
nn.ReLU(),
nn.Dropout2d(dropout),
nn.Softmax(dim=1)
)
```
The resulting wrapped `Model` can be used as a **custom architecture** as such,
or can be a **subcomponent of a larger model**. For instance, we can use Thinc's
[`chain`](https://thinc.ai/docs/api-layers#chain) combinator, which works like
`Sequential` in PyTorch, to combine the wrapped model with other components in a
larger network. This effectively means that you can easily wrap different
components from different frameworks, and "glue" them together with Thinc:
```python
from thinc.api import chain, with_array, PyTorchWrapper
from spacy.ml import CharacterEmbed
wrapped_pt_model = PyTorchWrapper(torch_model)
char_embed = CharacterEmbed(width, embed_size, nM, nC)
model = chain(char_embed, with_array(wrapped_pt_model))
```
In the above example, we have combined our custom PyTorch model with a character
embedding layer defined by spaCy.
[CharacterEmbed](/api/architectures#CharacterEmbed) returns a `Model` that takes
a ~~List[Doc]~~ as input, and outputs a ~~List[Floats2d]~~. To make sure that
the wrapped PyTorch model receives valid inputs, we use Thinc's
[`with_array`](https://thinc.ai/docs/api-layers#with_array) helper.
You could also implement a model that only uses PyTorch for the transformer
layers, and "native" Thinc layers to do fiddly input and output transformations
and add on task-specific "heads", as efficiency is less of a consideration for
those parts of the network.
### Using wrapped models {#frameworks-usage}
To use our custom model including the PyTorch subnetwork, all we need to do is
register the architecture using the
[`architectures` registry](/api/top-level#registry). This assigns the
architecture a name so spaCy knows how to find it, and allows passing in
arguments like hyperparameters via the [config](/usage/training#config). The
full example then becomes:
```python
### Registering the architecture {highlight="9"}
from typing import List
from thinc.types import Floats2d
from thinc.api import Model, PyTorchWrapper, chain, with_array
import spacy
from spacy.tokens.doc import Doc
from spacy.ml import CharacterEmbed
from torch import nn
@spacy.registry.architectures("CustomTorchModel.v1")
def create_torch_model(
nO: int,
width: int,
hidden_width: int,
embed_size: int,
nM: int,
nC: int,
dropout: float,
) -> Model[List[Doc], List[Floats2d]]:
char_embed = CharacterEmbed(width, embed_size, nM, nC)
torch_model = nn.Sequential(
nn.Linear(width, hidden_width),
nn.ReLU(),
nn.Dropout2d(dropout),
nn.Linear(hidden_width, nO),
nn.ReLU(),
nn.Dropout2d(dropout),
nn.Softmax(dim=1)
)
wrapped_pt_model = PyTorchWrapper(torch_model)
model = chain(char_embed, with_array(wrapped_pt_model))
return model
```
The model definition can now be used in any existing trainable spaCy component,
by specifying it in the config file. In this configuration, all required
parameters for the various subcomponents of the custom architecture are passed
in as settings via the config.
```ini
### config.cfg (excerpt) {highlight="5-5"}
[components.tagger]
factory = "tagger"
[components.tagger.model]
@architectures = "CustomTorchModel.v1"
nO = 50
width = 96
hidden_width = 48
embed_size = 2000
nM = 64
nC = 8
dropout = 0.2
```
Remember that it is best not to rely on any (hidden) default values to ensure
that training configs are complete and experiments fully reproducible.
Note that when using a PyTorch or Tensorflow model, it is recommended to set the
GPU memory allocator accordingly. When `gpu_allocator` is set to "pytorch" or
"tensorflow" in the training config, cupy will allocate memory via those
respective libraries, preventing OOM errors when there's available memory
sitting in the other library's pool.
```ini
### config.cfg (excerpt)
[training]
gpu_allocator = "pytorch"
```
## Custom models with Thinc {#thinc}
Of course it's also possible to define the `Model` from the previous section
entirely in Thinc. The Thinc documentation provides details on the
[various layers](https://thinc.ai/docs/api-layers) and helper functions
available. Combinators can be used to
[overload operators](https://thinc.ai/docs/usage-models#operators) and a common
usage pattern is to bind `chain` to `>>`. The "native" Thinc version of our
simple neural network would then become:
```python
from thinc.api import chain, with_array, Model, Relu, Dropout, Softmax
from spacy.ml import CharacterEmbed
char_embed = CharacterEmbed(width, embed_size, nM, nC)
with Model.define_operators({">>": chain}):
layers = (
Relu(hidden_width, width)
>> Dropout(dropout)
>> Relu(hidden_width, hidden_width)
>> Dropout(dropout)
>> Softmax(nO, hidden_width)
)
model = char_embed >> with_array(layers)
```
Note that Thinc layers define the output dimension (`nO`) as the first argument,
followed (optionally) by the input dimension (`nI`). This is in contrast to how
the PyTorch layers are defined, where `in_features` precedes `out_features`.
### Shape inference in Thinc {#thinc-shape-inference}
It is **not** strictly necessary to define all the input and output dimensions
for each layer, as Thinc can perform
[shape inference](https://thinc.ai/docs/usage-models#validation) between
sequential layers by matching up the output dimensionality of one layer to the
input dimensionality of the next. This means that we can simplify the `layers`
definition:
> #### Diff
>
> ```diff
> layers = (
> Relu(hidden_width, width)
> >> Dropout(dropout)
> - >> Relu(hidden_width, hidden_width)
> + >> Relu(hidden_width)
> >> Dropout(dropout)
> - >> Softmax(nO, hidden_width)
> + >> Softmax(nO)
> )
> ```
```python
with Model.define_operators({">>": chain}):
layers = (
Relu(hidden_width, width)
>> Dropout(dropout)
>> Relu(hidden_width)
>> Dropout(dropout)
>> Softmax(nO)
)
```
Thinc can even go one step further and **deduce the correct input dimension** of
the first layer, and output dimension of the last. To enable this functionality,
you have to call
[`Model.initialize`](https://thinc.ai/docs/api-model#initialize) with an **input
sample** `X` and an **output sample** `Y` with the correct dimensions:
```python
### Shape inference with initialization {highlight="3,7,10"}
with Model.define_operators({">>": chain}):
layers = (
Relu(hidden_width)
>> Dropout(dropout)
>> Relu(hidden_width)
>> Dropout(dropout)
>> Softmax()
)
model = char_embed >> with_array(layers)
model.initialize(X=input_sample, Y=output_sample)
```
The built-in [pipeline components](/usage/processing-pipelines) in spaCy ensure
that their internal models are **always initialized** with appropriate sample
data. In this case, `X` is typically a ~~List[Doc]~~, while `Y` is typically a
~~List[Array1d]~~ or ~~List[Array2d]~~, depending on the specific task. This
functionality is triggered when [`nlp.initialize`](/api/language#initialize) is
called.
### Dropout and normalization in Thinc {#thinc-dropout-norm}
Many of the available Thinc [layers](https://thinc.ai/docs/api-layers) allow you
to define a `dropout` argument that will result in "chaining" an additional
[`Dropout`](https://thinc.ai/docs/api-layers#dropout) layer. Optionally, you can
often specify whether or not you want to add layer normalization, which would
result in an additional
[`LayerNorm`](https://thinc.ai/docs/api-layers#layernorm) layer. That means that
the following `layers` definition is equivalent to the previous:
```python
with Model.define_operators({">>": chain}):
layers = (
Relu(hidden_width, dropout=dropout, normalize=False)
>> Relu(hidden_width, dropout=dropout, normalize=False)
>> Softmax()
)
model = char_embed >> with_array(layers)
model.initialize(X=input_sample, Y=output_sample)
```
## Create new trainable components {#components}
In addition to [swapping out](#swap-architectures) layers in existing
components, you can also implement an entirely new,
[trainable](/usage/processing-pipelines#trainable-components) pipeline component
from scratch. This can be done by creating a new class inheriting from
[`TrainablePipe`](/api/pipe), and linking it up to your custom model
implementation.
For details on how to implement pipeline components, check out the usage guide
on [custom components](/usage/processing-pipelines#custom-component) and the
overview of the `TrainablePipe` methods used by
[trainable components](/usage/processing-pipelines#trainable-components).
### Example: Entity relation extraction component {#component-rel}
This section outlines an example use-case of implementing a **novel relation
extraction component** from scratch. We'll implement a binary relation
extraction method that determines whether or not **two entities** in a document
are related, and if so, what type of relation connects them. We allow multiple
types of relations between two such entities (a multi-label setting). There are
two major steps required:
1. Implement a [machine learning model](#component-rel-model) specific to this
task. It will have to extract candidate relation instances from a
[`Doc`](/api/doc) and predict the corresponding scores for each relation
label.
2. Implement a custom [pipeline component](#component-rel-pipe) - powered by the
machine learning model from step 1 - that translates the predicted scores
into annotations that are stored on the [`Doc`](/api/doc) objects as they
pass through the `nlp` pipeline.
Run this example use-case by using our project template. It includes all the
code to create the ML model and the pipeline component from scratch.
It also contains two config files to train the model:
one to run on CPU with a Tok2Vec layer, and one for the GPU using a transformer.
The project applies the relation extraction component to identify biomolecular
interactions in a sample dataset, but you can easily swap in your own dataset
for your experiments in any other domain.
#### Step 1: Implementing the Model {#component-rel-model}
We need to implement a [`Model`](https://thinc.ai/docs/api-model) that takes a
**list of documents** (~~List[Doc]~~) as input, and outputs a **two-dimensional
matrix** (~~Floats2d~~) of predictions:
> #### Model type annotations
>
> The `Model` class is a generic type that can specify its input and output
> types, e.g. ~~Model[List[Doc], Floats2d]~~. Type hints are used for static
> type checks and validation. See the section on [type signatures](#type-sigs)
> for details.
```python
### The model architecture
@spacy.registry.architectures.register("rel_model.v1")
def create_relation_model(...) -> Model[List[Doc], Floats2d]:
model = ... # 👈 model will go here
return model
```
We adapt a **modular approach** to the definition of this relation model, and
define it as chaining two layers together: the first layer that generates an
instance tensor from a given set of documents, and the second layer that
transforms the instance tensor into a final tensor holding the predictions:
> #### config.cfg (excerpt)
>
> ```ini
> [model]
> @architectures = "rel_model.v1"
>
> [model.create_instance_tensor]
> # ...
>
> [model.classification_layer]
> # ...
> ```
```python
### The model architecture {highlight="6"}
@spacy.registry.architectures.register("rel_model.v1")
def create_relation_model(
create_instance_tensor: Model[List[Doc], Floats2d],
classification_layer: Model[Floats2d, Floats2d],
) -> Model[List[Doc], Floats2d]:
model = chain(create_instance_tensor, classification_layer)
return model
```
The `classification_layer` could be something like a
[Linear](https://thinc.ai/docs/api-layers#linear) layer followed by a
[logistic](https://thinc.ai/docs/api-layers#logistic) activation function:
> #### config.cfg (excerpt)
>
> ```ini
> [model.classification_layer]
> @architectures = "rel_classification_layer.v1"
> nI = null
> nO = null
> ```
```python
### The classification layer
@spacy.registry.architectures.register("rel_classification_layer.v1")
def create_classification_layer(
nO: int = None, nI: int = None
) -> Model[Floats2d, Floats2d]:
return chain(Linear(nO=nO, nI=nI), Logistic())
```
The first layer that **creates the instance tensor** can be defined by
implementing a
[custom forward function](https://thinc.ai/docs/usage-models#weights-layers-forward)
with an appropriate backpropagation callback. We also define an
[initialization method](https://thinc.ai/docs/usage-models#weights-layers-init)
that ensures that the layer is properly set up for training.
We omit some of the implementation details here, and refer to the
[spaCy project](https://github.com/explosion/projects/tree/v3/tutorials/rel_component)
that has the full implementation.
> #### config.cfg (excerpt)
>
> ```ini
> [model.create_instance_tensor]
> @architectures = "rel_instance_tensor.v1"
>
> [model.create_instance_tensor.tok2vec]
> @architectures = "spacy.HashEmbedCNN.v1"
> # ...
>
> [model.create_instance_tensor.pooling]
> @layers = "reduce_mean.v1"
>
> [model.create_instance_tensor.get_instances]
> # ...
> ```
```python
### The layer that creates the instance tensor
@spacy.registry.architectures.register("rel_instance_tensor.v1")
def create_tensors(
tok2vec: Model[List[Doc], List[Floats2d]],
pooling: Model[Ragged, Floats2d],
get_instances: Callable[[Doc], List[Tuple[Span, Span]]],
) -> Model[List[Doc], Floats2d]:
return Model(
"instance_tensors",
instance_forward,
init=instance_init,
layers=[tok2vec, pooling],
refs={"tok2vec": tok2vec, "pooling": pooling},
attrs={"get_instances": get_instances},
)
# The custom forward function
def instance_forward(
model: Model[List[Doc], Floats2d],
docs: List[Doc],
is_train: bool,
) -> Tuple[Floats2d, Callable]:
tok2vec = model.get_ref("tok2vec")
tokvecs, bp_tokvecs = tok2vec(docs, is_train)
get_instances = model.attrs["get_instances"]
all_instances = [get_instances(doc) for doc in docs]
pooling = model.get_ref("pooling")
relations = ...
def backprop(d_relations: Floats2d) -> List[Doc]:
d_tokvecs = ...
return bp_tokvecs(d_tokvecs)
return relations, backprop
# The custom initialization method
def instance_init(
model: Model,
X: List[Doc] = None,
Y: Floats2d = None,
) -> Model:
tok2vec = model.get_ref("tok2vec")
tok2vec.initialize(X)
return model
```
This custom layer uses an [embedding layer](/usage/embeddings-transformers) such
as a [`Tok2Vec`](/api/tok2vec) component or a [`Transformer`](/api/transformer).
This layer is assumed to be of type ~~Model[List[Doc], List[Floats2d]]~~ as it
transforms each **document into a list of tokens**, with each token being
represented by its embedding in the vector space.
The `pooling` layer will be applied to summarize the token vectors into **entity
vectors**, as named entities (represented by ~~Span~~ objects) can consist of
one or multiple tokens. For instance, the pooling layer could resort to
calculating the average of all token vectors in an entity. Thinc provides
several
[built-in pooling operators](https://thinc.ai/docs/api-layers#reduction-ops) for
this purpose.
Finally, we need a `get_instances` method that **generates pairs of entities**
that we want to classify as being related or not. As these candidate pairs are
typically formed within one document, this function takes a [`Doc`](/api/doc) as
input and outputs a `List` of `Span` tuples. For instance, the following
implementation takes any two entities from the same document, as long as they
are within a **maximum distance** (in number of tokens) of eachother:
> #### config.cfg (excerpt)
>
> ```ini
>
> [model.create_instance_tensor.get_instances]
> @misc = "rel_instance_generator.v1"
> max_length = 100
> ```
```python
### Candidate generation
@spacy.registry.misc.register("rel_instance_generator.v1")
def create_instances(max_length: int) -> Callable[[Doc], List[Tuple[Span, Span]]]:
def get_candidates(doc: "Doc") -> List[Tuple[Span, Span]]:
candidates = []
for ent1 in doc.ents:
for ent2 in doc.ents:
if ent1 != ent2:
if max_length and abs(ent2.start - ent1.start) <= max_length:
candidates.append((ent1, ent2))
return candidates
return get_candidates
```
This function in added to the [`@misc` registry](/api/top-level#registry) so we
can refer to it from the config, and easily swap it out for any other candidate
generation function.
#### Intermezzo: define how to store the relations data {#component-rel-attribute}
> #### Example output
>
> ```python
> doc = nlp("Amsterdam is the capital of the Netherlands.")
> print("spans", [(e.start, e.text, e.label_) for e in doc.ents])
> for value, rel_dict in doc._.rel.items():
> print(f"{value}: {rel_dict}")
>
> # spans [(0, 'Amsterdam', 'LOC'), (6, 'Netherlands', 'LOC')]
> # (0, 6): {'CAPITAL_OF': 0.89, 'LOCATED_IN': 0.75, 'UNRELATED': 0.002}
> # (6, 0): {'CAPITAL_OF': 0.01, 'LOCATED_IN': 0.13, 'UNRELATED': 0.017}
> ```
For our new relation extraction component, we will use a custom
[extension attribute](/usage/processing-pipelines#custom-components-attributes)
`doc._.rel` in which we store relation data. The attribute refers to a
dictionary, keyed by the **start offsets of each entity** involved in the
candidate relation. The values in the dictionary refer to another dictionary
where relation labels are mapped to values between 0 and 1. We assume anything
above 0.5 to be a `True` relation. The ~~Example~~ instances that we'll use as
training data, will include their gold-standard relation annotations in
`example.reference._.rel`.
```python
### Registering the extension attribute
from spacy.tokens import Doc
Doc.set_extension("rel", default={})
```
#### Step 2: Implementing the pipeline component {#component-rel-pipe}
To use our new relation extraction model as part of a custom
[trainable component](/usage/processing-pipelines#trainable-components), we
create a subclass of [`TrainablePipe`](/api/pipe) that holds the model.

```python
### Pipeline component skeleton
from spacy.pipeline import TrainablePipe
class RelationExtractor(TrainablePipe):
def __init__(self, vocab, model, name="rel"):
"""Create a component instance."""
self.model = model
self.vocab = vocab
self.name = name
def update(self, examples, drop=0.0, set_annotations=False, sgd=None, losses=None):
"""Learn from a batch of Example objects."""
...
def predict(self, docs):
"""Apply the model to a batch of Doc objects."""
...
def set_annotations(self, docs, predictions):
"""Modify a batch of Doc objects using the predictions."""
...
def initialize(self, get_examples, nlp=None, labels=None):
"""Initialize the model before training."""
...
def add_label(self, label):
"""Add a label to the component."""
...
```
Typically, the **constructor** defines the vocab, the Machine Learning model,
and the name of this component. Additionally, this component, just like the
`textcat` and the `tagger`, stores an **internal list of labels**. The ML model
will predict scores for each label. We add convenience methods to easily
retrieve and add to them.
```python
### The constructor (continued)
def __init__(self, vocab, model, name="rel"):
"""Create a component instance."""
# ...
self.cfg = {"labels": []}
@property
def labels(self) -> Tuple[str]:
"""Returns the labels currently added to the component."""
return tuple(self.cfg["labels"])
def add_label(self, label: str):
"""Add a new label to the pipe."""
self.cfg["labels"] = list(self.labels) + [label]
```
After creation, the component needs to be
[initialized](/usage/training#initialization). This method can define the
relevant labels in two ways: explicitely by setting the `labels` argument in the
[`initialize` block](/api/data-formats#config-initialize) of the config, or
implicately by deducing them from the `get_examples` callback that generates the
full **training data set**, or a representative sample.
The final number of labels defines the output dimensionality of the network, and
will be used to do
[shape inference](https://thinc.ai/docs/usage-models#validation) throughout the
layers of the neural network. This is triggered by calling
[`Model.initialize`](https://thinc.ai/api/model#initialize).
```python
### The initialize method {highlight="12,15,18,22"}
from itertools import islice
def initialize(
self,
get_examples: Callable[[], Iterable[Example]],
*,
nlp: Language = None,
labels: Optional[List[str]] = None,
):
if labels is not None:
for label in labels:
self.add_label(label)
else:
for example in get_examples():
relations = example.reference._.rel
for indices, label_dict in relations.items():
for label in label_dict.keys():
self.add_label(label)
subbatch = list(islice(get_examples(), 10))
doc_sample = [eg.reference for eg in subbatch]
label_sample = self._examples_to_truth(subbatch)
self.model.initialize(X=doc_sample, Y=label_sample)
```
The `initialize` method is triggered whenever this component is part of an `nlp`
pipeline, and [`nlp.initialize`](/api/language#initialize) is invoked.
Typically, this happens when the pipeline is set up before training in
[`spacy train`](/api/cli#training). After initialization, the pipeline component
and its internal model can be trained and used to make predictions.
During training, the method [`update`](/api/pipe#update) is invoked which
delegates to
[`Model.begin_update`](https://thinc.ai/docs/api-model#begin_update) and a
[`get_loss`](/api/pipe#get_loss) function that **calculates the loss** for a
batch of examples, as well as the **gradient** of loss that will be used to
update the weights of the model layers. Thinc provides several
[loss functions](https://thinc.ai/docs/api-loss) that can be used for the
implementation of the `get_loss` function.
```python
### The update method {highlight="12-14"}
def update(
self,
examples: Iterable[Example],
*,
drop: float = 0.0,
set_annotations: bool = False,
sgd: Optional[Optimizer] = None,
losses: Optional[Dict[str, float]] = None,
) -> Dict[str, float]:
# ...
docs = [eg.predicted for eg in examples]
predictions, backprop = self.model.begin_update(docs)
loss, gradient = self.get_loss(examples, predictions)
backprop(gradient)
losses[self.name] += loss
# ...
return losses
```
After training the model, the component can be used to make novel
**predictions**. The [`predict`](/api/pipe#predict) method needs to be
implemented for each subclass of `TrainablePipe`. In our case, we can simply
delegate to the internal model's
[predict](https://thinc.ai/docs/api-model#predict) function that takes a batch
of `Doc` objects and returns a ~~Floats2d~~ array:
```python
### The predict method
def predict(self, docs: Iterable[Doc]) -> Floats2d:
predictions = self.model.predict(docs)
return self.model.ops.asarray(predictions)
```
The final method that needs to be implemented, is
[`set_annotations`](/api/pipe#set_annotations). This function takes the
predictions, and modifies the given `Doc` object in place to store them. For our
relation extraction component, we store the data in the
[custom attribute](#component-rel-attribute)`doc._.rel`.
To interpret the scores predicted by the relation extraction model correctly, we
need to refer to the model's `get_instances` function that defined which pairs
of entities were relevant candidates, so that the predictions can be linked to
those exact entities:
```python
### The set_annotations method {highlight="5-6,10"}
def set_annotations(self, docs: Iterable[Doc], predictions: Floats2d):
c = 0
get_instances = self.model.attrs["get_instances"]
for doc in docs:
for (e1, e2) in get_instances(doc):
offset = (e1.start, e2.start)
if offset not in doc._.rel:
doc._.rel[offset] = {}
for j, label in enumerate(self.labels):
doc._.rel[offset][label] = predictions[c, j]
c += 1
```
Under the hood, when the pipe is applied to a document, it delegates to the
`predict` and `set_annotations` methods:
```python
### The __call__ method
def __call__(self, doc: Doc):
predictions = self.predict([doc])
self.set_annotations([doc], predictions)
return doc
```
There is one more optional method to implement: [`score`](/api/pipe#score)
calculates the performance of your component on a set of examples, and returns
the results as a dictionary:
```python
### The score method
def score(self, examples: Iterable[Example]) -> Dict[str, Any]:
prf = PRFScore()
for example in examples:
...
return {
"rel_micro_p": prf.precision,
"rel_micro_r": prf.recall,
"rel_micro_f": prf.fscore,
}
```
This is particularly useful for calculating relevant scores on the development
corpus when training the component with [`spacy train`](/api/cli#training).
Once our `TrainablePipe` subclass is fully implemented, we can
[register](/usage/processing-pipelines#custom-components-factories) the
component with the [`@Language.factory`](/api/language#factory) decorator. This
assigns it a name and lets you create the component with
[`nlp.add_pipe`](/api/language#add_pipe) and via the
[config](/usage/training#config).
> #### config.cfg (excerpt)
>
> ```ini
> [components.relation_extractor]
> factory = "relation_extractor"
>
> [components.relation_extractor.model]
> @architectures = "rel_model.v1"
> # ...
>
> [training.score_weights]
> rel_micro_p = 0.0
> rel_micro_r = 0.0
> rel_micro_f = 1.0
> ```
```python
### Registering the pipeline component
from spacy.language import Language
@Language.factory("relation_extractor")
def make_relation_extractor(nlp, name, model):
return RelationExtractor(nlp.vocab, model, name)
```
You can extend the decorator to include information such as the type of
annotations that are required for this component to run, the type of annotations
it produces, and the scores that can be calculated:
```python
### Factory annotations {highlight="5-11"}
from spacy.language import Language
@Language.factory(
"relation_extractor",
requires=["doc.ents", "token.ent_iob", "token.ent_type"],
assigns=["doc._.rel"],
default_score_weights={
"rel_micro_p": None,
"rel_micro_r": None,
"rel_micro_f": None,
},
)
def make_relation_extractor(nlp, name, model):
return RelationExtractor(nlp.vocab, model, name)
```
Run this example use-case by using our project template. It includes all the
code to create the ML model and the pipeline component from scratch.
It contains two config files to train the model:
one to run on CPU with a Tok2Vec layer, and one for the GPU using a transformer.
The project applies the relation extraction component to identify biomolecular
interactions, but you can easily swap in your own dataset for your experiments
in any other domain.